iPhone is equipped by one of the most powerful cameras on earth so you can take amazing photos with iPhone. Photos are the most precious and memorable items in our life that we cherish forever as long as we live. Surely, that doesn't stop us from upgrading our smartphones. Undoubtedly, iPhone users will keep on upgrading their device but what about the pictures you have taken on your old iPhone ? How do you transfer photos from iPhone to new iPhone? Well, in this tutorial we are going to resolve that mystery and show you how to transfer photos from previous iPhone to new iPhone. So, let's dig into the solutions and see how to accomplish this task without much hassle.
- Method 1: Transfer Photos from iPhone to iPhone Using iTunes
- Method 2: Transfer Photos between iPhones without iTunes or iCloud
- Method 3: Move Photos from iPhone to iPhone or iPad with iCloud
- Method 4: Send Photos from iPhone to iPhone with Other Apps
Method 1: How to Transfer Photos from iPhone to iPhone Using iTunes
iTunes is the program that most iOS users are familiar with because it is the official tool to manage iOS device on a computer. There is a great "backup & restore" feature in iTunes so you can use it to transfer content from one iPhone to another. However, one thing you should keep in mind is that the iOS version should be the same on old and new iPhone. If not, the restore function would fail.
Plus, if you still had the plan to use the old iPhone, then I suggest looking at the method listed below because the latest iOS will certainly slow down performance on old iOS device. This is a well-known secret in 2017.
Step 1: Install iTunes on the computer and connect old iPhone to computer.
Step 2: Once the iPhone is detected by iTunes, then click iPhone icon on the upper left corner. Go to Summary tab and click "Back Up Now" button. Then iTunes starts to backup all content and settings on the old iPhone. This would take minutes or hours depending on how much data on the device.
Step 3: When the backup process is finished, eject the old iPhone and connect new iPhone to computer. iTunes should show the device name and all you have to do is go to Summary section.
Step 4: Click on "Restore Backup" and choose the most recent backup file.
Step 5: Press the "Restore" button again and all the files from the backup will be transferred to new iPhone.

Cons:
1. iOS version should the same on both iPhone.
2. Data on new iPhone would be erased after restore.
3. Time consuming than Method 2.
4. Low success rate.
Method 2: Transfer Photos between iPhones without iTunes or iCloud
People are always preferring simple and less time-consuming solution in terms of content transfer. No one would like to wait for hours or take a lot of extra efforts. In this tutorial, we will share the best solution we find out recently to transfer photos from iPhone to iPhone in a couple of minutes without any hassle.
TunesBro PhoneTrans is a fantastic content transferring program to migrate different types of data from one phone to another. It supports all the iOS devices including iPhone, iPad and iPods as well as Android, Blackberry and Windows Mobile. The transferring speed is outstanding and you need no internet connection to finish the process. It is just like copying and pasting the pictures from one device to another.
Top Features of TunesBro PhoneTrans
- Powerful and easy to use.
- Support multiple data types, including photos, contacts, sms, music, video, apps and WhatsApp .
- Able to restore content from iTunes, iCloud, OneDrive backup.
- Backup all content and settings on iPhone in one click.
- Permanently erase all data on old device to protect your privacy.
Supported Smartphone : iPhone X, iPhone 8/8P, iPhone 7/7P, iPhone 6S/5S/5/4S and more than 3000+ mobile devices.
Step 1Download and Installation
Download PhoneTrans, install it like a normal program and run the software after the installation is done. Click on "Switch" from the home screen of the tool.

Step 2Connection
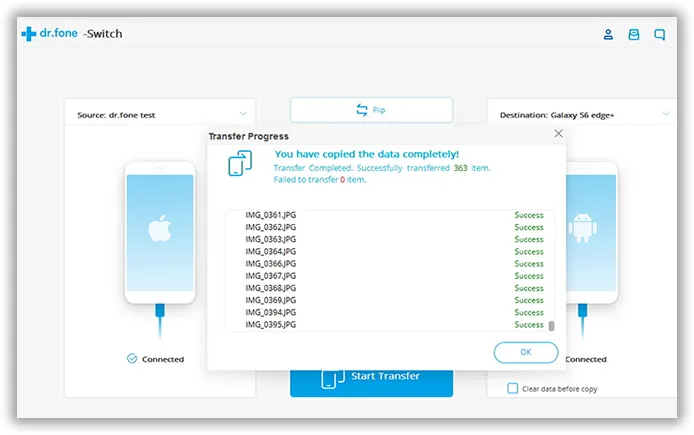
Connect both iPhones to same PC using two different USB data cables. Both iPhones should appear side by side and make sure the left side shows the iPhone from which you are sending the photos and right side shows your new iPhone. If not, then simply click on " Flip" icon to change the positions.

Step 3 Start Transferring Photos to New iPhone
Select photos from the menu and hit the "Start Transfer" button. All the transferring will be done automatically and you can track the transferring process in real time. Once the migration is finished, you can unplug both phones and enjoy!

According to our test, it only takes a few minutes to complete the transfer of 500+ photos from iPhone 7 to iPhone 8P. This is 5X faster than using iTunes and 10X faster than using iCloud.
Method 3: How to Move Photos from iPhone to iPhone/iPad with iCloud
iCloud is yet another official service that helps to backup and restore data on iPhone. You will need an active iCloud account in order to use the service and then follow the mentioned below steps to transfer the photos one iPhone to another:
Step 1 : Install iCloud Drive app on both iPhones. It is freely available on the Apple App store.
Step 2 : From your old iPhone, sync all the pictures to your iCloud account.
Step 3 : Now, open the app on your new iPhone and login using the same account information where you have saved the backup.
Step 4 : Open your iCloud account and find the pictures from your old device. You can selectively download the pictures on your new iPhone or you can download the full folder. Easy as that.

Cons:
1. Take hours or days if Internet connection is slow.
2. Newly synced photos not going to Photo app. You can only view it in iCloud Drive app.
Method 4: How to Send Photos from iPhone to iPhone without Computer
iCloud is only used on Apple device and it is not a good cloud storage option in many areas, at least in here. The download speed is very slow when comparing to other service like Google Drive, Dropbox or OneDrive. If you were a fan of those services, then you can still use them to transfer photos across different devices. In this part, we will take Dropbox for example.
Step 1 : Download and install Dropbox app on old iphone.
Step 2 : Add photos to Dropbox app so they can be shared on other devices.
Step 3 : Once the upload process is done, install Dropbox app on new iPhone.
Step 4 : Sign in the same Dropbox account and choose the folder you want to download on new iPhone. After that, all selected files will be on your new iPhone automatically. However, this takes time.
Cons:
1. Only 2GB space is free. This is not enough for most of us.
2. Need a lot of time if Internet connection is not good.
Conclusion:
People will keep upgrading their devices with the arrival of the latest technology. However, no matter what, no data will have left behind on your old devices. Thanks to TunesBro PhoneTrans, transferring data couldn't be easier than that. Although, we showed how to transfer photos from iPhone to iPhone but you can use the same tool to transfer music, videos, messages, contacts and other data from one smartphone to another.

