With all our increasing collection of games, applications, and photos, one thing that many of us never seem to have enough in our Android or other smartphones is space. But, most Android phones permit users to get around with this issue by using SD cards. These cards as you know are available in different sizes and different data storage capabilities.
Inside each SD card, regardless of whether it is micro or normal, there are a number of rows of small memory chips. They are responsible for storing all our data regardless of whether they are photos, music, documents or any other data for that matter. As there are no moving parts, the storage is done quickly without requiring any effort from the user. As soon as it is inserted into your phone, it will start working. In most cases, your Android phone will automatically scan your SD card. The phone will pull all the data and store them in a proper place for your future access.
However, there are unexpected situations that the files stored in SD card got deleted accidentally or formatted by unauthorized permission. Now the question comes to how to recover those deleted files or formatted data. The good new is that you have a couple of options with the development of technology. The quickest way is restoring from existing backups. And the second choice is using Android data recovery software such as TunesBro DiskLab for Android. I will share all the necessary steps for the two solutions.
- Part 1: How to Recover Deleted Files on Android SD Card from Backup File
- Part 2: How to Recover Deleted Files on Android SD Card with Data Recovery Software
- Part 3: How to Recover Deleted Files on Android SD Card with Dr.Fone
Part 1: How to Recover Deleted Files on Android SD Card from Backup File
Since the introduction of Dropbox, file backup becomes a very easy jobs, especially the service can be accessed from computer, smartphone, tablet and other portable devices. For Android phone and tablet, Google Drive is the default backup app you can use immediately. So if you have ever used any of those services, then you can restore the deleted files from them by going to the app folder or its website.
Besides cloud backup, using software for backup is another choice. Smartphones made by Samsung, HTC, Sony or Huawei comes with default backup apps, such as Samsung Kies, Sony Xperia Companion , HTC Sync Manager. If you were the one like this, then open the backup app and find the location of backup file. Finally, restoring the files from the backup file.

Part 2: How to Recover Deleted Files on SD Card with Android Data Recovery Software
If you forgot backing up the files on SD card, then you still have chances to recover them. However, this process would be a bit complicated than Part 1. In this part, I will take TunesBro DiskGeeker as an example. The reason is that this SD card recovery program is much more powerful than other Android Data Recovery software when comparing with functionality and easy of use. It supports almost all the mainstream Android phones and tablets sold on markets as well as SD cards. Below is the step-by-step guide on how to recover the deleted files from your Android SD Card:
In addition, this program supports a wide range of Android phones and tablets from various brand. Besides photos recovery, it is also capable of retrieving other types of data. All of them will be listed in below:
Android Phones: LG, Sony, Samsung, HUAWEI, HTC, Motorola and other Android brands.
Type of Data: Music, Videos, Photos, App Data, eBooks, Office and Documents.
Step 1Connect SD Card to a computer Through Memory Card Reader
The first thing you have to do is to connect the SD card to your desktop or laptop computer through a memory card reader, which is a standard part on all computers. Please remember the drive name of this SD card. This will be in help in Step 3.
Step 2 Download, Install, and Launch TunesBro DiskGeeker
As soon as your card and PC are connected, just download and install TunesBro DiskGeeker on that computer. The download link is shown above. Just click it to download the installation file. When installation is completed, click the desktop shortcut icon to open the program on computer.

Step 3 Choose File Type and Drive Name
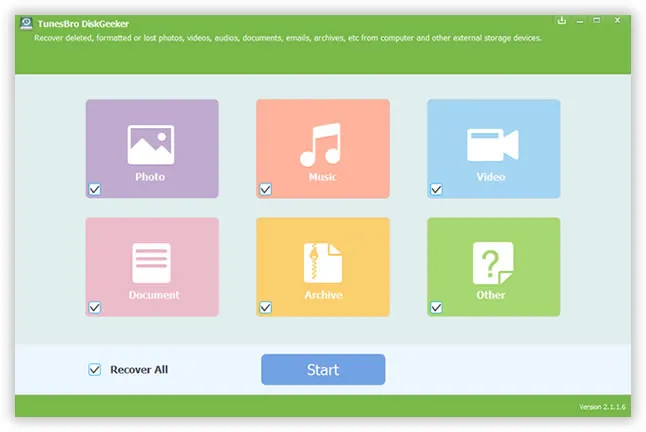
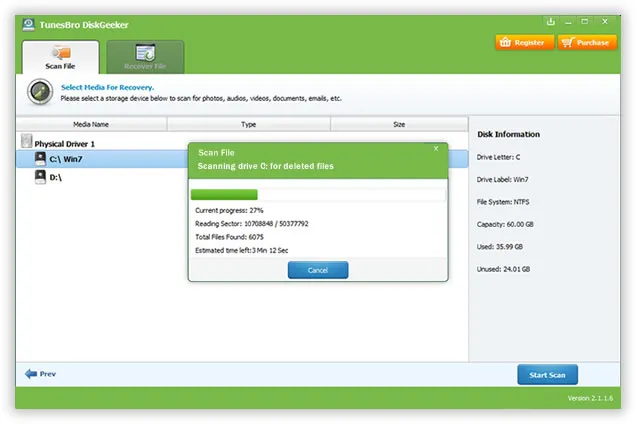
In this step you need to select the right file type. It can be photos, music, video, document, archive or other types of data. If the SD card was formatted, then you should select all the file types. Click Start button and select the drive name of SD card i next step. Now, TunesBro DiskGeeker will scan all the files stored on that SD card.

Step 4 Scan and Recover Deleted Files on Android SD Card
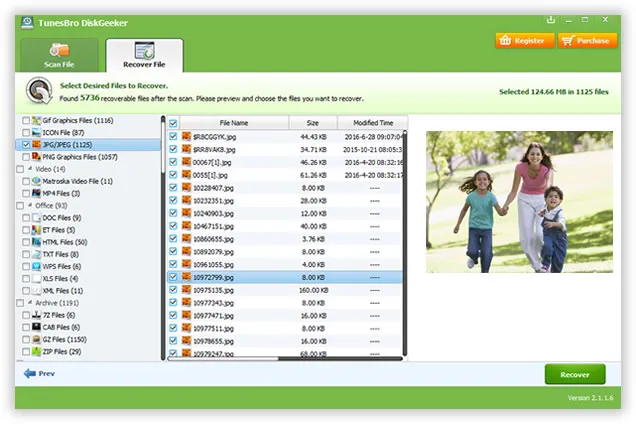
The file scanning process will last for a few seconds and once it is finished, you will get the chance to preview the files. Select the items that you wish to recover and then click on the Recover button to recover the selected items.

Accidental file deletion happens a lot among Android users and for now, there is no need to worry too much about it once you followed the guidelines from above tutorials. After going through the steps, you will be aware how important it is to backup the data on your phone. There are tons of free and paid Android recovery apps for this. And when the files got deleted, please stop using the phone because the storage of deleted files can be rewritten by new coming data. Once the data being overwritten, it is almost impossible to recover them unless you take it to police or federal agents.
Part 3: How to Recover Deleted Files on Android SD Card with Dr.Fone
Dr.Fone is another well-known Android data recovery program developed by Wondershare. It has a built-in module for SD data recovery.
First, download and install the program on a computer. Then connect your phone to computer with USB cable. Make sure USB debugging mode is enabled on the phone. From the left side bar, select SD Card Data Recovery.

Now, select the data type you wish to recover and click "Next" button. The program starts scanning and analyzing the whole file system on the phone to try its best locating the deleted files on that SD card. After scanning, all searched files will be presented in different categories and you can preview each file before recovery. At the end, click "Recover" button to save selected files to computer.
